Ideas for making halloween spooktacular in your middle school science classroom!
You either love halloween or hate it when you teach middle school science. I’ve decided to embrace it over the years and I am going to share some of my easy to implement, classroom-tested, middle school halloween lesson ideas, activities and costumes! There are lots of free ideas here and some affiliate links if you need to purchase any items that you don’t already have in your science lab. (Thanks in advance if you buy something from the links!)
Read on to gather these ideas:
- Print and Go Spooky Science Infographics and Student Worksheet
- Boo Bubbles Dry Ice Experiment Lesson
- Low Prep Science Teacher Costumes
Spooky Science Lessons
So many middle school teachers say “I can’t do something fun or spooky because we are currently learning __ and no halloween activities relate.” NOT TRUE! Here is a set of spooky science infographics that give your students practice reading and interpreting science text and diagrams. This practice builds skills that students need for science literacy across disciplines!
- SPOOKTACULAR INFOGRAPHICS from Chemical and Engineering News

* Note you might need to sign up for a free account to access the infographics!
- Print the infographics to post in your classroom.
- Print the free doodle worksheet (see below) for gathering information.
- Have students circulate to read science information and interpret science diagrams and graphics.
- Play some spooky music and have fun!
BLOOD
Get creepy with some chemistry and biology and teach your students about blood! Check out this cool infographic about blood for inspiration! This one is great too! It explains why different organisms have different colors of blood!
FEAR
What regions of the brain are involved in the fear response? This infographic is crawling with cool science surrounding the science of fear!
DECOMPOSITION
Why do living things smell SO BAD as they decompose? Your students will find this one particularly GROSS! Find out here!
PUMPKINS
People go crazy for their pumpkin spiced lattes this time of year! What chemicals explain the color, smell and taste of pumpkins? Check out the chemistry here.
Print and Go Classroom Idea: Print the infographics from the links posted above (blood, pumpkins, decomposition and fear) and tape a few copies of each one around the room. Give each student this Spooktacular Science Graphic Organizer and have them walk around gathering facts and information while you play some halloween music in the background!

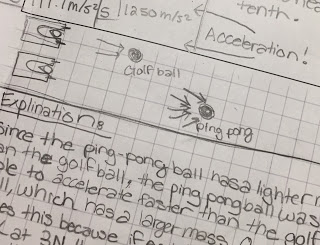
Here is an example of completed work!

2. BOO Bubbles with Dry Ice

I absolutely love this lesson and look forward to it each year! It does require dry ice and finding that in your area might take a little leg work, but your students will LOVE you for going the extra mile! This lesson involves a few fun Dry Ice Demos and then time for students to experiment with dry ice and bubble solution!
Prep:
- Get Dry Ice Pellets from local a local CO2 distributor in your area. You usually need to call ahead and arrange pick up.
- Keep the dry ice in a cooler but keep in mind that it needs to have some air flow or the pressure will build up!
- Have safety gloves and tongues to avoid contact with skin
- Small Flasks for the Student Activity (1 per small group)
- Large container of bubble solution
- Small cups or beakers (Any size is fine- Just needs to be big enough for kids to dip 2 fingers into bubble solution)
- Plastic trays (Optional- but these help contain the mess and can be rinsed easily at the end of the activity.)
The lesson sequence:
- Explain safety rules for dry ice.
- Engage students with dry ice demos (phenomena)
- Allow time for class discussion and questions about demos
- Small group lab work- Boo Bubbles in flasks
- Students record observations of their lab experience
- Discussion of results with emphasis on density of Carbon Dioxide gas and unique phase change characteristic (solid to gas -no liquid phase)
I like to start by giving some safety rules for dry ice. Rule #1 don’t touch dry ice with your skin. Rule #2 Be sure to follow rule #1. Then I like to do some demos. You can find a lot of options online and students love to observe and discuss anything that has to do with dry ice! This one uses a large glass bowl, water, dry ice and bubble solution and a bubble wand. Put dry ice in some water and the bowl will fill with Carbon Dioxide gas. Blow a regular bubble using a wand and bubble solution. You want it to land right in the center of the bowl. The regular bubble will float on the carbon dioxide gas!
Ask students: Why does one substance float on another? What gases are in the bubble? What is happening with the molecules of Carbon Dioxide this is different than the gas in the bubble?
Here are some links to some other dry ice demos that you can do to kick off this lesson:
Steve Spangler has some great tips!

This bubble demo is pretty easy to pull off. I used an old peanut butter jar and some plastic tubing I bought at a hardware store. I like to have kids compare a dry ice bubble with a regular bubble that I blow from a wand. We compare and contrast their behavior. Kids notice right away how the dry ice bubble falls to the ground faster. What a fun visual for comparing fluid density!
While the kids love the demos, the best part of this lesson is sending kids to the lab tables to do some experimenting on their own! Here is the set-up that I provide each small group of students.

I post this procedure on the board for student reference:
- Dip 2 fingers into the bubble solution. Make sure the ends of both fingers are covered and slimy with the solution.
- Swipe across the top of the glass erlenmeyer flask. Your goal is to create a thin film of the bubble solution across the entire opening. You may need to try a few times! Just like a bubble wand needs bubble solution across the opening, you want to create a thin layer of solution across the opening of the flask. DO NOT pour the solution of soap into the flask! If you are unable to get a “BOO” bubble after 15 tries ask for teacher assistance.
- Observe the boo bubbles and record what you see happening in your science journal. Be specific and draw a diagram that shows the entire lab set-up and process.
Here is a video of this lab in action:
Wrap up your spooktacular lesson by having students share their observations. You might want to do a gallery walk so students can see each other’s notebooks! Discuss the density of CO2 and the density of the air around us.
3. Science Teacher Costumes
It might seem cheesy in middle school but my students love when I dress up. My two favorite halloween costumes are pictured below. They take almost no prep and make your halloween-themed lesson extra special!

Mad Scientist Costume Items
Dark Eye Shadow or other makeup to make dark “explosion” residue around the outline of the goggles
Silver Hair Spray (to make crazy grey hair!)

Casual Witch Costume Items
Must Have Science Teachers Love Brains T-shirt
Straight Leg Jeans (These are so comfy and come in multiple colors!)
Don’t fright the fun of halloween with your middle school students. Plan an engaging lesson and share some spooky spirit instead. I hope you gathered some ideas that you can use in your middle school science classroom. Wishing you all the best the fall season has to offer!
Kate @Cativatescience